1) How to install and launch CaptureFlux 3.3
Download a zip-file by clicking on
the pink button above. It contains an exe-file
called
captureflux_33en_setup.exe. Double-click
on it to install automatically CaptureFlux on
your system. You may choose a full installation,
or a minimal installation without directshow
filters. The full installation is warmly recommended
if you want to use the advanced features of
CaptureFlux.
Before launching CaptureFlux
with the Start menu (or with an icon
on your desktop), it is recommended to connect
at least one video source: It could be a DV camcorder
on a firewire link, a webcam on a USB link, or
an analogic video acquisition card. You may
also try with a MovieBox USB
from
Pinnacle, if it is of type B. Check it
by opening Pinnacle's Studio under
the tab capture,
and look if the device name is
Pinnacle MovieBox-B, then close Studio
without changing any setting on the moviebox
and its connection. This procedure is compulsory
every time you want to use CaptureFlux with
the Moviebox, because it cannot launch the Moviebox
directly. The other types of MovieBox are not
supported by now. .
When you are done connecting
a video source and then launch CaptureFlux, you
will get the main window.


back
to top
2) How to get started with the program
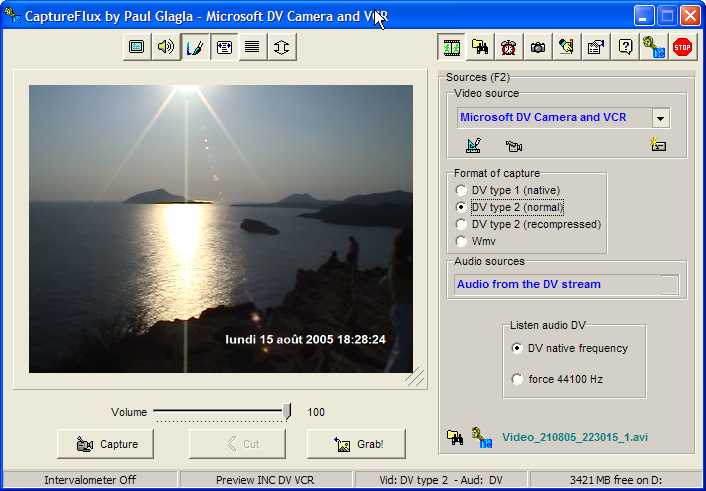
user interface
 Normally, if
you have connected a video source before launching
CaptureFlux, you should see the video
displayed in real time on the video window
included in the main form. If you have several
connected sources, you should first check if
the current active source is the good one. A
list of all available video sources is given
in the combobox 1
where you may change the selected one, if necessary. If
you connect new sources while CaptureFlux
is active, you must click on the button Normally, if
you have connected a video source before launching
CaptureFlux, you should see the video
displayed in real time on the video window
included in the main form. If you have several
connected sources, you should first check if
the current active source is the good one. A
list of all available video sources is given
in the combobox 1
where you may change the selected one, if necessary. If
you connect new sources while CaptureFlux
is active, you must click on the button  in order to update the list of video sources.
After
that, you should manage the audio part.
This happens in 2.
In some cases,there is nothing to do, because
the audio is interleaved in the main video stream. It
happens for
DV or mpeg2 streams, like the MovieBox. You
may nevertheless remove all audio streams ("No
Audio") or put another audio stream, coming
from a separate audio device.
If there is no
standard included audio, or if you want to capture
another audio stream. you may select an auxiliary
audio source (or else stay without audio). To
understand what an audio source
is here, consider that a sound card is an
audio source. Generally there is only one, appearing
in a combobox. On my system it is SoundMax Digital
Audio. But selecting a sound card is not
sufficient. You must also select an entry, for
instance the microphone, the Line In,
the CD player or even the general mixer that
brings all sounds passing through the sound
card (even the little jingles
of Windows when you make a mistake!). This could
be done directly with the software provided
with your sound card. If you don't find it or
don't like it, I have included in CaptureFlux
a the little icon  for
changing some settings of the sound
card. But be aware that this is not
really a part of CaptureFlux, but rather
a part of
the sound card driver called by CaptureFlux.
It is not very convenient to use this button,
and you may make
mistakes while operating this way. If you know
how to setup directly the sound card for
recording, and if you can use a better program to do
it, then use it. for
changing some settings of the sound
card. But be aware that this is not
really a part of CaptureFlux, but rather
a part of
the sound card driver called by CaptureFlux.
It is not very convenient to use this button,
and you may make
mistakes while operating this way. If you know
how to setup directly the sound card for
recording, and if you can use a better program to do
it, then use it.
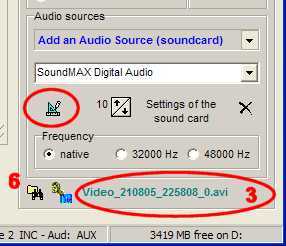
After
that, you will have to notice the default folder
and name of the video to be captured. Look at 3.
The default name is made from a root (here video),
an optional date and time when the present
session of CaptureFlux has started, (here
in french style: 21th of August 2005 at
22 hours 58 minutes and 8 seconds) and
a rank number starting with 0. This folder
and name may be changed in the Folder panel
that will be presented below. To open the folder
where the clip is to be saved, it is easy to click
on the button  in 6.
in 6.
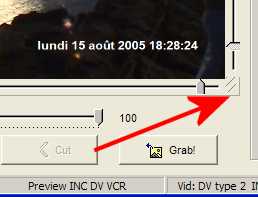
It's
now time to start your first capture. To start,
click indeed on the Button Capture 4.
But you may alternatively simply type the Space
bar. The border of the screen becomes red to
indicate that a capture is in progress. To
stop the capture, click again on the button, or
type the Space bar. The format of the captured
video depends on the choice made in
7.
Generally you may choose:
- either the native
format,
that is recommended if your system is
short on power, and if you fear to drop
frames. With a DV source you will in
fact have two native formats DV type 1 or DV type
2 (normal). The good side of this format
is that it does not need much CPU time
(the hard compression work is done in
the video device)
and delivers the best quality
available with a given video source. The
drawback,
is that the files are often very big,
and no inlay of datetime is possible,
because the video frames are not recompressed
by the processor. So in these formats,
even if the datetime is displayed on
preview, it is not kept on the recorded
file.
- either the format DV
type 2 recompressed. The main advantage
of this format is to allow the inlay
of datetimes. It is also useful if you
have a non DV source,
for instance a webcam, and you want
to capture a clip that will be included
in a DV video editing project. For
me, DV type 2 is the best format for
non linear video editing.
On the other hand, it needs a decompression/recompression
and so looses some quality. Sometimes
you may also get interlacing issues.
- the format wmv (Windows
media video) is a solution proposed
by Microsoft which may be compared to
DivX.
It gives files that may be very smaller
that in other formats,
and often with an acceptable quality. Choose
the
High Quality if you want good
images;
with the medium setting, you may record
very long videos (several days on a
big hard disk) with a quality sufficient for
some purposes..
During
the capture, or during a preview without recording, you
may grab images from the stream and save them
on the hard disk by clicking on the button Grab! in
5
or by clicking on the video window. The panel "Grab Images" will
then be displayed.
back
to top
3) The buttons to operate on the video
Two groups of buttons are
displayed in the toolbar at the top of the main
form:
The group called
A has
effects on the displayed video, at least on
its previewing. The following buttons are available:
 Display the video in full screen . To
come back type Alt+enter (it toggles
between Full screen and Windowed mode),
or right-click on the screen to open a popup
menu. It has no effect on the saved file.
Display the video in full screen . To
come back type Alt+enter (it toggles
between Full screen and Windowed mode),
or right-click on the screen to open a popup
menu. It has no effect on the saved file.
 Put
the sound of CaptureFlux On or Off. It
has no effect on the recorded video. Caution:
this button has no effect on an auxiliary
audio source, because in that case you hear
directly the sound card of your system,
and not the sound produced by my application. Put
the sound of CaptureFlux On or Off. It
has no effect on the recorded video. Caution:
this button has no effect on an auxiliary
audio source, because in that case you hear
directly the sound card of your system,
and not the sound produced by my application.
 This button starts to inlay the datetime
into the video. In the inlay panel you
may change many settings of this feature, for
example choose between the real time or
the datecode of the capture (for a DV stream). This
feature is only enabled if you have made
a full installation of CaptureFlux,
and if it has not been unchecked in the
Inlay Panel. You may also move the
position of the inlay, by clicking on the
right bottom corner of the video window.
Two trackbars will then appear. When finished,
click again on the corner and they will
disappear.
This button starts to inlay the datetime
into the video. In the inlay panel you
may change many settings of this feature, for
example choose between the real time or
the datecode of the capture (for a DV stream). This
feature is only enabled if you have made
a full installation of CaptureFlux,
and if it has not been unchecked in the
Inlay Panel. You may also move the
position of the inlay, by clicking on the
right bottom corner of the video window.
Two trackbars will then appear. When finished,
click again on the corner and they will
disappear.
This button
has an effect on the captured video,
only if it is recompressed. In format DV type
1 or DV type 2 (normal),the video frames
remain unchanged, thus the inlays are not
recorded to the file, but only displayed
with the preview. It is the same for all
native formats. But in DV type 2 recompressed,
or in Wmw the inlay is permanently written
to the captured video frames.
 This button toggles between a native
display of the video, and a display forced
to the 4x3 proportions (Sorry 16x9 is not
yet available). It has no effect on the
captured video, but only on the preview. It
is useful for a DV source to get the aspect
ratio of 4x3, when the stream is delivered
in 720x576 if it's Pal or 720x480 in NTSC. The
same is true with the MovieBox that delivers
images in format DVD.
This button toggles between a native
display of the video, and a display forced
to the 4x3 proportions (Sorry 16x9 is not
yet available). It has no effect on the
captured video, but only on the preview. It
is useful for a DV source to get the aspect
ratio of 4x3, when the stream is delivered
in 720x576 if it's Pal or 720x480 in NTSC. The
same is true with the MovieBox that delivers
images in format DVD.
 This button is only enabled if the Video
Deinterlacer Filter of Pinnacle
Studio is installed on your system.
If you activate it, the video preview will
be deinterlaced, an so will the grabbed
images. As for inlays, this has an effect on
the recorded video
only if it has been recompressed (DV type
2 recompressed, or wmv) but not in native
format.
This button is only enabled if the Video
Deinterlacer Filter of Pinnacle
Studio is installed on your system.
If you activate it, the video preview will
be deinterlaced, an so will the grabbed
images. As for inlays, this has an effect on
the recorded video
only if it has been recompressed (DV type
2 recompressed, or wmv) but not in native
format.
 This button flips the video, up/down. It
is enabled only if the inlay is enabled
(checked in the inlay panel). It
is sometimes useful, because some configurations
may give a reversed image.
This button flips the video, up/down. It
is enabled only if the inlay is enabled
(checked in the inlay panel). It
is sometimes useful, because some configurations
may give a reversed image.
back
to top
Without giving
all the details, because this page is only a
help to Quick
Start, this section
will present the panels for changing the settings
of Captureflux.
This is done by browsing the buttons of group
B, each
one calling a different panel:
 The sources panel is
the main panel for selecting video and audio
sources. You may choose the format of the
video capture, and choose an audio source,
either included in the stream, or added
by another device.
The sources panel is
the main panel for selecting video and audio
sources. You may choose the format of the
video capture, and choose an audio source,
either included in the stream, or added
by another device.
 The folders panel lets
you select folders and names for the captured
videos or the grabbed images. You may also
indicate a program to be launched with a
click with all captured videos open in it.
I suggest to keep the default DVdate which
can open many files at once to get data
about them or to change them.
The folders panel lets
you select folders and names for the captured
videos or the grabbed images. You may also
indicate a program to be launched with a
click with all captured videos open in it.
I suggest to keep the default DVdate which
can open many files at once to get data
about them or to change them.
 The schedule panel is
the place to schedule
a future capture. You must of course
keep the computer on and the video device
connected during all the time.
The schedule panel is
the place to schedule
a future capture. You must of course
keep the computer on and the video device
connected during all the time.
 The images grab panel
shows the grabbed image, and lets you launch
the intervalometer for taking snapshots
automatically.
The images grab panel
shows the grabbed image, and lets you launch
the intervalometer for taking snapshots
automatically.
 The inlay panel
has many settings to modify the inlay,
for instance the font of the inlay, or the
format of the date and time. I find also
very useful to modify the time before inlaying
it, when I missed to set a time difference
in my camcorder on a travel abroad.
The inlay panel
has many settings to modify the inlay,
for instance the font of the inlay, or the
format of the date and time. I find also
very useful to modify the time before inlaying
it, when I missed to set a time difference
in my camcorder on a travel abroad.
 The preferences panel
is a collection of different useful settings.
For example, you may choose a system profile for
the Windows media capture in wmv, if the
four default profiles that I have selected
in the Sources Panel are not sufficient.
Here you may also indicate if the grabbed
images should be bmp or jpeg, and
if they are jpeg, choose the compression
rate. In this panel you may also choose
if the preferences are to be saved in the
registry or not, in order to find them again
at next start. I recommend to check Save
the preferences when quit.
The preferences panel
is a collection of different useful settings.
For example, you may choose a system profile for
the Windows media capture in wmv, if the
four default profiles that I have selected
in the Sources Panel are not sufficient.
Here you may also indicate if the grabbed
images should be bmp or jpeg, and
if they are jpeg, choose the compression
rate. In this panel you may also choose
if the preferences are to be saved in the
registry or not, in order to find them again
at next start. I recommend to check Save
the preferences when quit.
 The help panel gives
a list of keyboard shortcuts and some properties
of your System.
The help panel gives
a list of keyboard shortcuts and some properties
of your System.
 The About panel gives
information about Paul Glagla and
about CaptureFlux and its restrictions
of use.
Let me remind you that CaptureFlux
is delivered freely only for personal use. Use
by a company,
an administration or during a professional
activity is forbidden and unlawful.
I give freely my products to web surfers
and video amateurs who respect this limitation,
but it is not fair for companies or professionals
to make money (or save money that could
have helped some professional programmers)
by using my hard work without even supporting
me.
The About panel gives
information about Paul Glagla and
about CaptureFlux and its restrictions
of use.
Let me remind you that CaptureFlux
is delivered freely only for personal use. Use
by a company,
an administration or during a professional
activity is forbidden and unlawful.
I give freely my products to web surfers
and video amateurs who respect this limitation,
but it is not fair for companies or professionals
to make money (or save money that could
have helped some professional programmers)
by using my hard work without even supporting
me.
 The quit button
exits from CaptureFlux when you are
finished.
The quit button
exits from CaptureFlux when you are
finished.
Do not hesitate to browse between
these panels (you may type F6 to go to
the next panel),
and look at the hints that appear in places
when the mouse moves. You should finally find
the settings that are adapted to your needs, and
then - if you have enabled the feature of saving
the preferences when quit in the Settings panel - find
these settings again over and over.
You may even hide all
panels when you are done by typing Alt+Backspace.
Of course this is only safe if you know some
keyboard shortcuts, because you won't have any
possibility to click on buttons when the main
form is reduced. Type Alt+Backspace again
to come back to the panels if you need to make
a change.
Have fun!
back
to top
|