


The menu Video of DVdate
to apply commands on the active file

Help pages about DVdate:


![]()
![]()
This page is better viewed in 1024x768.
Last update
on Saturday, April 19, 2008
click on a menu command to go to the corresponding paragraph
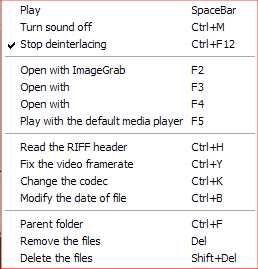
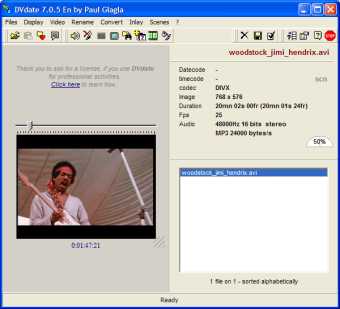
The menu Video contains some different commands that change the play mode of the video, that open the selected files in other applications, that modify some characteristics of the video file, or manage the file itself. Remember that the available commands may vary with the selected file. Some commands are only available with DV files, or even DV files of type 2, others with files having datecode, etc...
![]() Play
plays the selected
video in DVdate.
You may also hit the Space
bar
of the keyboard. While the video is playing, three
items are continuously updated: the datecode and
the timecode
on the information
panel - if available in the video - and
below the video, the timestamp, ie the position
of the current frame in the video in hours:
minutes: seconds: frames. If you are playing
a DV video of type 1, then the aspect ratio (4x3 or 16x9)
and the audio frequency may also change from frame to frame.
They are updated in real-time during the play.
Play
plays the selected
video in DVdate.
You may also hit the Space
bar
of the keyboard. While the video is playing, three
items are continuously updated: the datecode and
the timecode
on the information
panel - if available in the video - and
below the video, the timestamp, ie the position
of the current frame in the video in hours:
minutes: seconds: frames. If you are playing
a DV video of type 1, then the aspect ratio (4x3 or 16x9)
and the audio frequency may also change from frame to frame.
They are updated in real-time during the play.
![]() Pause
puts the video in the pause mode. The Space
bar also toggles
between Play and Pause. In pause mode, which
is the default mode when a video is selected,
it's easy to navigate through the video with
the trackbar above the video or by
typing CTRL+arrow
at the keyboard. With the arrow keys Right
and Left you may step forward or
backward for one frame, with the arrow keys
Up and Down you may step forward
or backward for one second, with the arrow
keys Page Up and Page Down you
may step forward or backward for one minute,
and with Home or End you
go back to Start or advance to the
End of the video.
Don't forget to hold the key CTRL pressed
at the same time than the arrow key.
If a scn file is available, you may
also browse from scene to scene with F8 and F9.
If it is not,
you may create one in the menu
Scenes.
Pause
puts the video in the pause mode. The Space
bar also toggles
between Play and Pause. In pause mode, which
is the default mode when a video is selected,
it's easy to navigate through the video with
the trackbar above the video or by
typing CTRL+arrow
at the keyboard. With the arrow keys Right
and Left you may step forward or
backward for one frame, with the arrow keys
Up and Down you may step forward
or backward for one second, with the arrow
keys Page Up and Page Down you
may step forward or backward for one minute,
and with Home or End you
go back to Start or advance to the
End of the video.
Don't forget to hold the key CTRL pressed
at the same time than the arrow key.
If a scn file is available, you may
also browse from scene to scene with F8 and F9.
If it is not,
you may create one in the menu
Scenes.
![]() Sound Off /Sound On
mutes the sound Off or On. You may launch
these commands not only while the file is
playing but also while it is paused, the
change will then only take effect when the
video is later played. CTRL+M
has the same effect. Remember that the
keys +
or -
from the numpad increase or decrease the volume.
Sound Off /Sound On
mutes the sound Off or On. You may launch
these commands not only while the file is
playing but also while it is paused, the
change will then only take effect when the
video is later played. CTRL+M
has the same effect. Remember that the
keys +
or -
from the numpad increase or decrease the volume.
![]() Stop deinterlacing or Deinterlace
activates or desactivates the deinterlace
process of the video. It is very useful to deinterlace for
instance DV videos to have a better image without stripes.
But this process is consuming CPU power. So if you computer
is limited in power, just desactivate this function. .
Stop deinterlacing or Deinterlace
activates or desactivates the deinterlace
process of the video. It is very useful to deinterlace for
instance DV videos to have a better image without stripes.
But this process is consuming CPU power. So if you computer
is limited in power, just desactivate this function. .
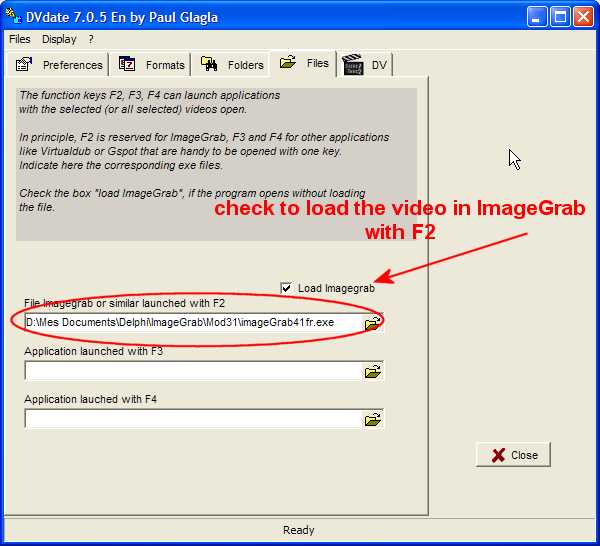
![]() Open with ImageGrab
or a name like that is a command that appears
only if in the Settings
panel
(F10) and
under the tab Files,
you have indicated a valid filename for ImageGrab. In
that case, this
command, or the function key F2 opens
the selected video in ImageGrab where
you may extract images in format
jpg or bmp from the video. If you don't
know my
freeware program ImageGrab, look
here. For some recent versions of ImageGrab,
be sure to check the box in order to open the selected video
file.
Open with ImageGrab
or a name like that is a command that appears
only if in the Settings
panel
(F10) and
under the tab Files,
you have indicated a valid filename for ImageGrab. In
that case, this
command, or the function key F2 opens
the selected video in ImageGrab where
you may extract images in format
jpg or bmp from the video. If you don't
know my
freeware program ImageGrab, look
here. For some recent versions of ImageGrab,
be sure to check the box in order to open the selected video
file.
![]() Open with xxx:
two third-party's applications may be affected
in the Settings to
the key F3
and F4.
When the key is pressed, the application is launched
with the selected files open in it. If the application can
open only one file at a time (like virtualdub
or gspot) then only the active file of DVdate
will be opened.
Open with xxx:
two third-party's applications may be affected
in the Settings to
the key F3
and F4.
When the key is pressed, the application is launched
with the selected files open in it. If the application can
open only one file at a time (like virtualdub
or gspot) then only the active file of DVdate
will be opened.
![]() Play with default media player
or F5 launches
the video in the application associated
in Windows with AVI files. Generally
it's
either Windows Media Player, or RealPlayer
or a program like that.
Play with default media player
or F5 launches
the video in the application associated
in Windows with AVI files. Generally
it's
either Windows Media Player, or RealPlayer
or a program like that.
![]() Read the RIFF header
or CTRL+H. This function opens
a new window
displaying the RIFF header of the
selected
avi file. This function is like the program riffwalk.exe that Microsoft
used to include in earlier versions of the SDK Windows but
that it no longer distributes. The old riffwalk
was actually only a command-line program, very
painful to use. DVdate does almost
the same, but very comfortably.
Read the RIFF header
or CTRL+H. This function opens
a new window
displaying the RIFF header of the
selected
avi file. This function is like the program riffwalk.exe that Microsoft
used to include in earlier versions of the SDK Windows but
that it no longer distributes. The old riffwalk
was actually only a command-line program, very
painful to use. DVdate does almost
the same, but very comfortably.
It would be too long to explain here what is the RIFF header of an AVI. Look for instance here for an explanation. It is probably the most comprehensive way to look what's inside the AVI file, and to verify if it is not corrupted. It contains information about file indexes, about the AVI standard avi 1.0 or avi 2.0 odml, and even information about the garbage bytes that some applications insert into the AVI files, sometimes to align the RIFF chunk in order to read them more easily, but sometimes also as a spy data about the application used for capture or transformation etc... If you want to be safe from such spy data, use my freeware application CaptureFlux which writes nothing more than needed into the video.
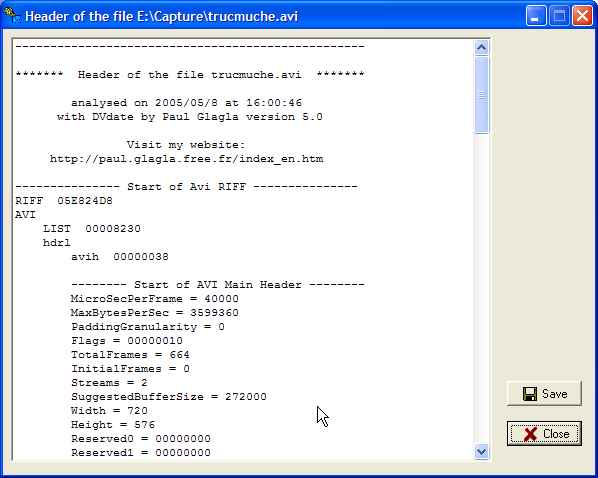
When the RIFF header is displayed, a button Save allows to save this header as a text file (with extension log) to your hard disk, and a button Close closes the Header window and returns to the main DVdate window.
![]() Fix the video framerate
or CTRL+Y fixes
the video framerate (number of frames per
second) in the header of the avi file. This
command is not enabled for avi DV of type 1.
It is specially useful for some MJPG avi
files with a wrong framerate given when
captured by an analog capture board. This
command opens a new window where you may
set a new framerate. Two values are proposed 25 or 29,97
frames per seconds, but you may also
set a personalized framerate. Click OK to
apply the new value
or Cancel to
quit the window without modification.
Fix the video framerate
or CTRL+Y fixes
the video framerate (number of frames per
second) in the header of the avi file. This
command is not enabled for avi DV of type 1.
It is specially useful for some MJPG avi
files with a wrong framerate given when
captured by an analog capture board. This
command opens a new window where you may
set a new framerate. Two values are proposed 25 or 29,97
frames per seconds, but you may also
set a personalized framerate. Click OK to
apply the new value
or Cancel to
quit the window without modification.
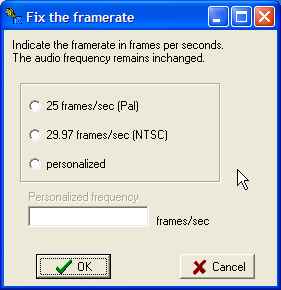
When you change the framerate, the audio stream is not modified. Thus the audio duration may now be different from the video duration as indicated by the information panel of DVdate (two different values for Duration, in parentheses is the audio duration) and the AVI may be out of sync. But if this was the case before fixing, a change of framerate may sometimes repair the issue..
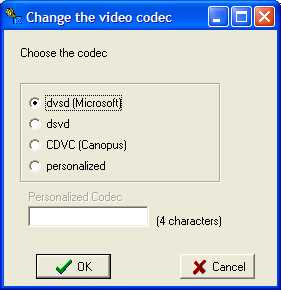
![]() Change the codec: When
you click on this command, DVdate
lets you fix the 4 characters
making the codec of the
AVI file, that is called the FourCC. Do
it only if you know what you do, otherwise your file could
be un-usable. Two purposes are to consider: first of all,
change XVID into DivX could sometimes help to read your
video on some standalone DVD players, who accept the second
FourCC and not the first. Secondly, you may meet different
kinds of DV codecs,of course the standard
dvsd from Microsoft, but also a variant dsvd or
some proprietary codecs
such CDVC from Canopus. By
changing the codec, you may operate a video with
one codec in an application accepting only another one.
Change the codec: When
you click on this command, DVdate
lets you fix the 4 characters
making the codec of the
AVI file, that is called the FourCC. Do
it only if you know what you do, otherwise your file could
be un-usable. Two purposes are to consider: first of all,
change XVID into DivX could sometimes help to read your
video on some standalone DVD players, who accept the second
FourCC and not the first. Secondly, you may meet different
kinds of DV codecs,of course the standard
dvsd from Microsoft, but also a variant dsvd or
some proprietary codecs
such CDVC from Canopus. By
changing the codec, you may operate a video with
one codec in an application accepting only another one.
![]() Modify the date of file
or CTRL+B replaces
the windows filedate of your video by the datecode, ie the
date and time when the video was shooted. This is useful
to show the datecode in most applications, even Windows
Explorer, and can be used to sort the files. In a video
file captured by a camcorder and transferred to a computer,
the file date is the date of the transfer. It has no great
significance. The date of capture by the camcorder is more
interesting. Of course this command is only available for
video DV having a datecode
Modify the date of file
or CTRL+B replaces
the windows filedate of your video by the datecode, ie the
date and time when the video was shooted. This is useful
to show the datecode in most applications, even Windows
Explorer, and can be used to sort the files. In a video
file captured by a camcorder and transferred to a computer,
the file date is the date of the transfer. It has no great
significance. The date of capture by the camcorder is more
interesting. Of course this command is only available for
video DV having a datecode
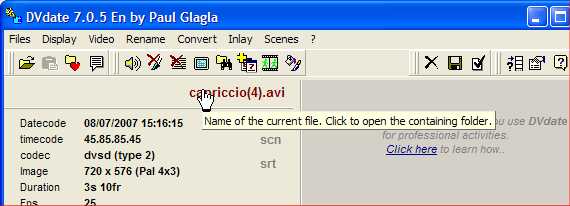
![]() Parent folder
or CTRL+F displays
the folder containing the selected video
file.
You may then have a direct access to this
file in
Windows to copy it, delete it, rename
it and son on... You may also open
the parent folder by clicking on the name
of the selected video above the information
panel.
Parent folder
or CTRL+F displays
the folder containing the selected video
file.
You may then have a direct access to this
file in
Windows to copy it, delete it, rename
it and son on... You may also open
the parent folder by clicking on the name
of the selected video above the information
panel.
![]() Remove the file
or Del removes
all selected files from the playlist.
The files on the hard drive are not modified,
only their names are removed from the playlist
Remove the file
or Del removes
all selected files from the playlist.
The files on the hard drive are not modified,
only their names are removed from the playlist
![]() Delete the file
or Shift+Del sends
all selected files to the Recycle Bin
or deletes them if they are too big for
the Recycle Bin.
A confirmation is indeed requested because
this command may delete them really from
the hard disk.
Delete the file
or Shift+Del sends
all selected files to the Recycle Bin
or deletes them if they are too big for
the Recycle Bin.
A confirmation is indeed requested because
this command may delete them really from
the hard disk.